This year marked my long-awaited debut. Dreams came true all at once, and I had to achieve a “five-year plan in a year”: construction, renovation, gardening. Oh, and cats! Unexpectedly, these fluffy friends entered my life:
Overall, I am pleased with the first harvest and my initial experience. I tried a maximum of unconventional methods, most of which I won’t use again, and I’ll explain why below. Unfortunately, I did not take photos during the process (lack of decent optics), but I promise to improve that next season.
Fabric Pots, Coconut Substrate, and the Japanese Tying Method
Several major failures of the year deserve their own dedicated section. I want to provide a detailed explanation of the issues in the hopes of helping someone avoid wasted time, money, and shattered hopes.
Seedling Bags Made of Agrotextile
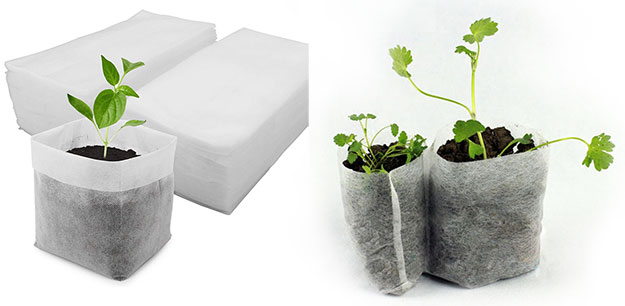
The biggest disappointment turned out to be the heavily advertised seedling pots made of nonwoven material (agrotextile, spunbond). These containers carry significant drawbacks that impacted the entire plant cultivation process.
Key Disadvantages of Spunbond Seedling Pots:
- Root damage
- Difficult transplantation
- Unstable structure
- Watering issues
If you want to experiment with spunbond seedling pots, don’t use them for all your seedlings at once.
Tomatoes and peppers actively develop lateral roots that penetrate through the fabric of these pots. After a couple of days, the exposed roots dry out, causing the plants to suffer, and they lag significantly behind those grown in plastic containers. Roots that grow through the bottom begin to rot altogether. Transplanting into larger containers becomes a very challenging task, and again, the roots suffer.
Spunbond pots are unstable, standing firmly only when tightly pressed against each other in a tray or when soil is excessively compacted. Spacing out plants as they grow was difficult, and root connections between neighboring bags had to be constantly broken. This issue was particularly relevant for tomatoes, whose roots grow more aggressively than their tops.
My only photo with seedlings in spunbond fabric pots.
The soil in fabric pots dries out quickly. Yes, it’s hard to overwater plants in spunbond pots, but with well-draining soil, moisture escapes through the fabric walls, leaving roots without enough water. As a result, the root system grows downward, lateral roots perish, and we end up with a super compact plant with a tiny root system that only starts recovering after being transplanted into open soil.
Planting seedlings in the ground from spunbond pots was also problematic. Recommendations suggest planting directly in the bags, which I tried with several cucumber plants – the result was disastrous. It seemed like the roots were not developing at all, and the plants remained stunted. Tomatoes might have fared better. However, removing the bags destroys the entire soil structure, tearing the roots… No more fabric pots for me.
Coconut Substrate and What’s Wrong with It
Growing my first-ever seedlings in pure coconut substrate was another mistake, paired with the fabric pots. I researched the topic beforehand, even wrote a guide on coconut substrate and followed the methods used by professional growers. Still, something went wrong.
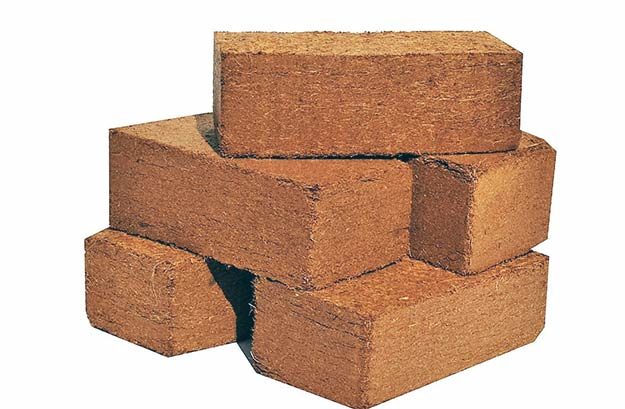
Here’s what a compressed coconut fiber brick looks like. It needs to be soaked and specially rinsed before planting.
Coconut fiber is entirely “nutritionally empty,” requiring regular supplementation with minerals (commonly called “compost tea”). This demands time, discipline, and advanced knowledge. Without specialized testing tools, it’s impossible to carry out the buffering process effectively, which will later affect the plants.
Coconut is an excellent drainage material but holds no water – all the moisture ends up at the bottom of the tray. Depending on the fiber’s coarseness, the substrate can be too loose, not clumping enough to support proper root system development from the start.
Next season, the remaining brick will go into a soil mix as an indispensable aerator and drainage component. But I see no reason to use it in its pure form, even considering its sterility (it’s better to treat the soil for seedlings with fungicides like Fundazol or Previcur during preparation, or inoculate with beneficial fungi like Bacillus subtilis or Trichoderma).
Japanese (Chinese) Method of Tying Tomatoes
Well, I should have known better. The method’s apparent simplicity and brilliance are only suitable for YouTube videos – on a real garden bed, it’s a tedious, problematic, and harmful way to tie and support tomatoes.
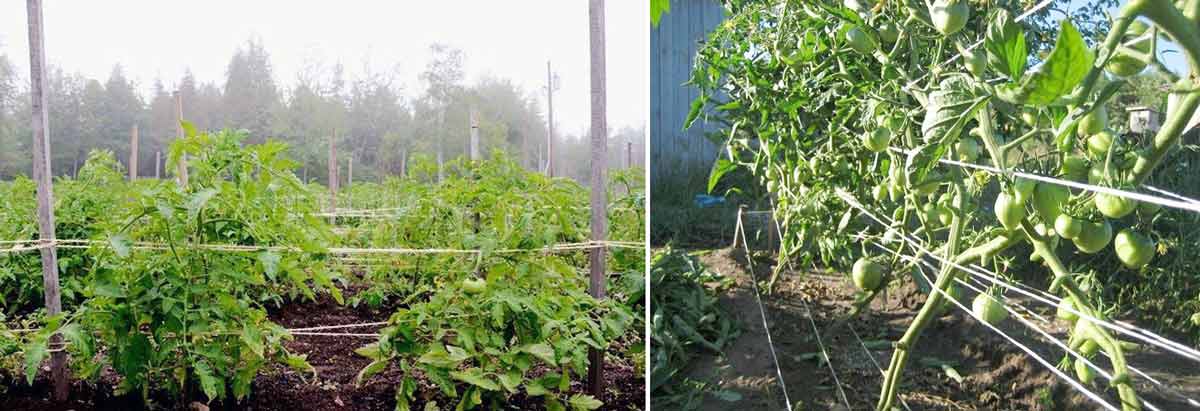
Not the most successful method for tying tomatoes. Tying according to the Japanese method requires kilometers of twine, with all the plants in a row eventually being interconnected. Removing a bush or working with an individual plant is impossible without tugging and disturbing the entire row.
There’s nothing to tie the tomato clusters to, and the twine sags significantly under the weight of the tomato foliage and stems, especially if you’re growing the plant in two or three stems. For the first 2-3 weeks, this type of tying looks neat, but after that, I was forced to come up with all sorts of “crutches” and re-tie almost 50 bushes every week.
This season, I plan to use the tying method from Valery’s “Garden & Vegetable Patch with Your Own Hands”.
There’s another oversight: we still haven’t planted a single tree or bush. A pity, really. By now, raspberries, currants, apple trees, and apricots would have settled in nicely. I also neglected regenerative treatment and sanitary pruning of the sole old apple tree, which the previous owners grafted with 9 different varieties. Some of these varieties are still producing fruit from their branches.
What Worked Out
Almost everything worked out. To be precise, nearly everything planted or sown grew. The Brussels sprouts didn’t make it as they were sown directly into the soil in late May in an ill-chosen spot. Even 60 seed potatoes yielded enough to last two people until mid-February.
Greenhouses Made from Spunbond and Fiberglass Reinforcement
I found an idea from “Vogorode.Pro” to use fiberglass reinforcement for greenhouses, and I’m very pleased. I stitched tunnels with pockets for the support from covering material, and all my freshly planted seedlings were initially kept in these mini-greenhouses. The only inconvenience was the need to lift the fabric for watering and inspection.
The sun doesn’t scorch them, most insects don’t get into the greenhouse, and it provides excellent wind protection. The only ones who enjoyed it were ants, who burrowed in and nibbled at my cabbage. This year, I will definitely take photos and share more details about my little greenhouses. By the way, these greenhouses saved some plants during the May hailstorm.
Outdoor Ground Tomatoes
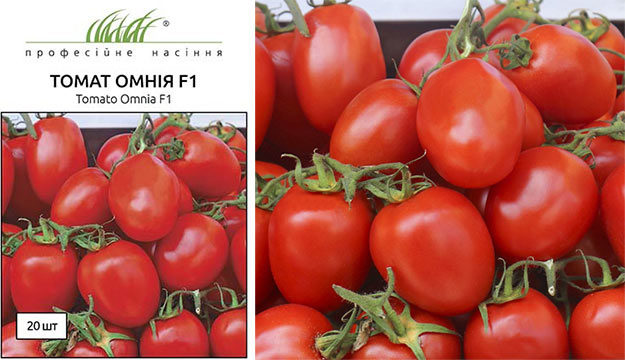
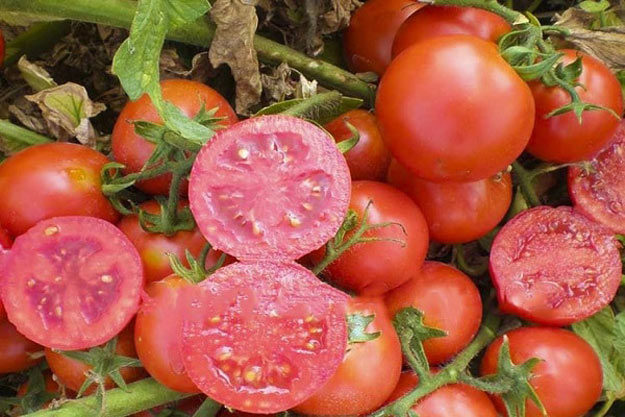
Omnia F1 (Nongwoo Bio Co. Ltd, Korea) — a determinate plum tomato genuinely resistant to 8 diseases. My jackpot. Affordable seeds with 100% germination. These plants withstood all my mistakes and even a hailstorm a week after planting.
I grew them with multiple stems, as I wasn’t entirely comfortable with pruning and decided not to trim thoughtlessly the first time. Height ranged from about 120–140 cm, and they can grow even taller if trained in one or two stems.
The bushes were covered in fruit, and I had to tie up the bunches and reinforce the branches. The flavor was like that of a good “technical” plum tomato — excellent for canning, acceptable in salads. I ordered Omnia again for this year, as it never disappoints.
Pink Top F1 (Nongwoo Bio Co. Ltd, Korea) — a pink indeterminate variety. No diseases. The most delicious tomato — very sweet with a concentrated tomato aroma. Even the unripe berries were tasty, which is unusual for hybrids. Again, I grew it with multiple stems, so the variety didn’t fully reveal its potential. I won’t repeat this one for now since I can’t provide the conditions needed for indeterminate varieties outdoors.
Uno Rosso F1 (United Genetics, Italy) — a low-growing red plum variety. Every bush had almost every possible disease (despite following Syngenta’s treatment protocols to the letter). Flavor-wise, Uno Rosso was more interesting than Omnia, but I managed to harvest no more than half of the fruits due to diseases. In whole-fruit canning, the taste was fantastic, as was the consistency. The skin is dense, and the yield is very high. I won’t plant it again for now.
Yellow River F1 — a sibling of Uno Rosso, a yellow plum tomato. My yield was low, and the flavor… was nonexistent. The fruit had a white core inside. It was almost disease-free.
Overall, there were about 50 tomato bushes, providing a harvest that was enough to eat, give away, and make tomato-based products and marinades. For my small family, this number of tomato plants was sufficient, even with a couple of unsuccessful varieties.
Cucumbers
The bane of this season. An unfavorable spring made me re-plant cucumbers three times, and I wasn’t alone in this. Initially, it was too wet and cold, while the next round was destroyed by ants and nematodes. Every variety got sick despite preventative treatments with fungicides and insecticides. Next time, I’ll only grow them from seedlings.
Kibria and Crispina F1 — I didn’t get a chance to try them. The bee-pollinated Sonata F1 performed well until fall — tasty, productive, and disease-free. Pasalimo from Syngenta was a disappointment. Amur F1 as an extra was as reliable as its reputation suggests, living up to its description.
Fifteen Sonata bushes and a couple of Amur bushes provided enough cucumbers for salads and canning.
Sweet Peppers
Due to mistakes made during the seedling phase, the peppers didn’t reach their full potential. However, there was one Japanese hybrid that will stay with me for many seasons to come.
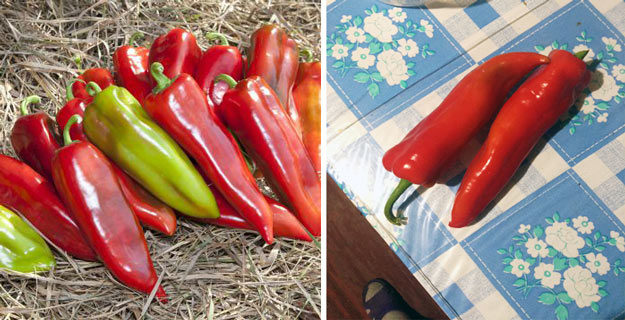
Sweet Pepper KS 2458 F1 from KITANO, a Kapia-type variety. Large, with a small seed chamber, sweet and aromatic. It didn’t fall ill and was covered in fruit. The bush is tall, sturdy, and resistant to cold.
An excellent sweet pepper from Kitano: KS 2458 F1
Minerva F1, Bubentsy from Gavrish (I will never purchase anything from these “breeders” again), and Prisma F1 didn’t leave much of an impression. I also have a packet of late Czech brown Ingrid seeds — I plan to try 5 bushes of it this season.
Cauliflower
Casper F1 and Fargo F1
These are excellent hybrids with strong, large flower clusters, and I plan to grow them again in the new season. I cultivated cauliflower through seedlings. I directly sowed Romanesco and purple cauliflower into the soil, but the heads never formed. I don’t see the point in repeating this experiment.
Snap (Asparagus) Beans
This was one of my main “must-haves” since we love snap beans and freeze them for the winter. However, I had to resow everything except Gold Star, as the seeds were eaten in the soil during germination. Unfortunately, I didn’t get a chance to try Serengeti, Blauhilde, Purple Teepee, and Paloma. Instead, I ended up sowing local varieties from inexpensive packets. Despite some challenges, I managed to enjoy fresh beans and freeze enough for the entire season.
Brussels Sprouts
I bought the most expensive variety—Franklin F1. It grew into a beautiful plant with tight little cabbage heads… and was completely destroyed by whiteflies. No treatment has any effect on this pest, an absolute nightmare. These tiny white moths sucked the life out of my Brussels sprouts, covered them in sticky honeydew that attracted swarms of wasps and flies, and in the end, sooty mold finished off the crop. I haven’t yet decided whether to try again next season, as I’m reluctant to purchase a specific whitefly treatment (Teppeki).
Greens and Herbs
The lettuce varieties Pearl Jem and Estroza from professional packaging were very impressive in terms of taste and germination. They didn’t bolt at all, so I never got to harvest seeds. Spinach Spiros, just one packet of 200 seeds, provided more than enough for freezing as well as salads. It’s a productive, fleshy spinach with large leaves that I’ll definitely grow again this year.
I didn’t care for Swiss chard—its flavor had an aftertaste of raw beets and astringent bitterness, which wasn’t to my liking. As for arugula, borage, parsley (Giant of Italy), dill (Mammoth), leaf celery, pak choi, and mizuna—they’re simply a flavor celebration! It’s so satisfying to step outside before lunch and pick a little bit of everything fresh…
Onions
My main goal was to grow leeks and chives. I grew leeks from seedlings, trimming both the roots and “leaves” during the process, resulting in an average outcome. I tried the varieties Swiss Giant, Caretka, and Elephant. The location I chose was shaded in the afternoon, which isn’t ideal for leeks. Nevertheless, I harvested enough onions for freezing and fresh consumption during the season. As for chives, they turned out to be ordinary bulb onions due to a variety mix-up. The same issue occurred with Winter Silver, which was supposed to be grown for greens—it ended up growing as a leek.
Fertilizers and Crop Protection Products
I thoroughly explored a variety of garden chemicals and bioproducts this season. The conclusion I reached is pretty straightforward—simplicity is key. While cultivating beneficial fungi like Trichoderma and hay bacillus is undoubtedly fascinating, it requires significant time, attention to temperature and other conditions, and a lot of self-discipline.
In the end, I still resorted to chemical plant protection because sticking to a schedule of weekly treatments alongside feeding and other gardening tasks proved unrealistic. Besides, pests like aphids and Colorado potato beetles are completely unfazed by products like Actofit and similar bio-preparations.
I carried out therapeutic and preventive treatments using fungicides and insecticides based on Syngenta’s recommended protocols. Although I didn’t always use their products, I selected active ingredients from their arsenal.
For plant nutrition, I followed the guidelines provided by Valery on the YouTube channel “Garden and Vegetable Plot with Your Own Hands.” These recommendations ranged from planting seedlings to final watering. I am beyond satisfied with the results—it’s truly a beginner’s guide. I also learned a lot from the “Prosperity” channel, particularly regarding fertilizer chemistry and the use of biological products. I highly recommend both channels.
Plans for the Next Season
I plan to document the process “as it unfolds”—from sowing seedlings to harvesting the crop. This approach should be more beneficial for beginners. However, I can’t promise a “natural” farming method. Best of luck to everyone in the upcoming season!

